CHAPTER 1 - Designing a leather sheath
Designing a leather sheath is in my opinion far way more complicated that designing a kydex sheath. First I always make a concept design. I am using pencil to outline a shape of the knife and then draw shape of the sheath I want to make. Then I am trying to figure out how to make such a shape from a leather.

I am wet forming almost all of my sheats and some rules have to be remember during that process:
- leather have to be oversized to wrap a handle of the knife
- wet leather can be formed in almost every shape like hot kydex
- leather can be stretched when is wet
With that informations we can start to draw a real design. I draw only one side of the sheath as you see on the picture.
Then I fold it in half so both sides of the shath will be identical when cut out off the paper.
I cut it off with a scissors
Of course loop is needed on only one side so I cut it off.
Remember that the paper is very thin When using leather you will have less material because more of it will be used to wrap the handle because of its thickness.But we can check if the design fit to the knife.
CHAPTER 2 - Cutting and forming
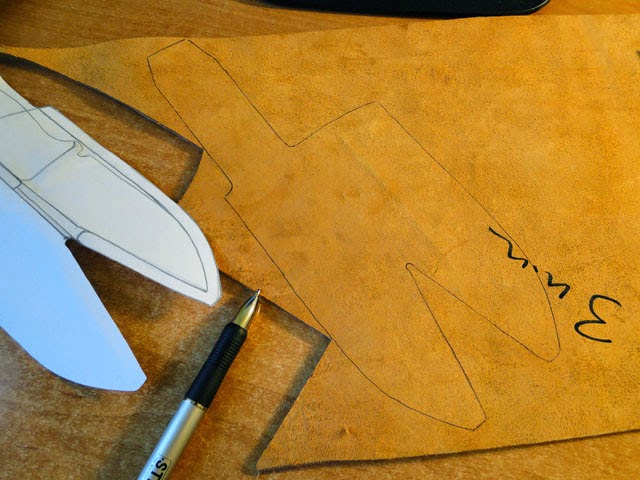
I applied a freshly cut paper template to the leather and outline the shape. If during fiting the template to the knifr you noticed that it is too small, you don't have to make another template. Just draw a little biger shape.
I often use leather punches on tight curves. Cuting the shape with a blade can lead to cuts on the material which weaken the leather. With punches I will get nice, round 'corners' that don't have to be finish with sandpaper.
Then I use a knife.to cutt the rest of the shape. Blade should be as thin as possible with sharp tip. But not only. Also a convex blade is a very good choice according to my experience.
Shape is ready. Forming with water can be started.
I put the leather to the water and wait for about
5-10 min for it to soak. Different leathers require different amounts of time to soak. Usually the thicker a leather is, the more time it needs to spend in water.
When leather is soaked well it is very soft and elastic. I wrap tke knife with a leather and use just my fingers to form it. Of course forming tools can be used in this process but I prefer smooth rounded lines that are easy to make with the fingers.
When knife is made off carbon steel it should be wrap with some kind of plastic foil so it will not get rusty. When it is stainless steel, rust is not a problem and any foil is needless. The sheath after forming looks like this. Now it will dry for about a couple of hours in room temperature or we can use a dryer to speed up the drying.
CHAPTER 3 - Making a loop
Note that I draw a line inside the sheath. I have done it now but to make the things more clear I should make in on the begining of chapter four.
I soak the leather with some camellia oil so it will get darker. Also softer for some amount of time. It is a perfect time to make a holes with an awl and stitching will be easier. Also I am doing it now because when loop will be stitched it will be difficult to cover the surface evenly.
I use a pencil to draw a lines on the loop.
Grooves for a thread are made with a groover.
Using ruler and an awl I making holes in the leather. First in each corner.
Then more holes in equal intervals.
Preparing a leather before glueing is veryimportant thing. I make a lot of scratches with a knife or use a sandpaper to roughtened the surface. The connection will be stronger then.
It depends on type of a glue, but almost always when glueing a leather, both surfaces have to be glued before connecting them. This time I was using a very quick-adhesive glue. I squeezed glued leather together for about a minute or two.
I pierce through both glued layers with an awl .
Then groove on the other side can be made now. Firstly sketch with a penci.
Grooves being done.
For this sheath I am using a 1mm SLAM thread which is waxed and very strong. I will said more about my way of stitching in chapter 5.
I make a simple knot inside the sheath...
...an scorch it with a match. Thanks to that both sides of the thread will be conected well and connection will be hiden in a grove.
I made the knot inside so on the other side our stitching will look very clean.
CHAPTER 4 - Making an inside layer
Inside layer is needed so the blade will not cut the thread during puting it to the sheath. It will also help us to me sheath smaller.
On the begining of chapter 3 I made a sketch inside the sheath. It is a shape of inside layer. Now I use transparent foil to redraw that shape so it will be easy to cut it off the leather.
I cut it with a scissors and outline it on a leather.
After cutting inside layer of the leather it ready to be mounted iside the sheath. Of course the surface have to be prepared for glueing. I did it as I did before with a loop scratching the surface.
I glued one side od the sheath.
One side is glued and mounted in place with the line I made before.
Before closing the sheath I apply some PALC balsam inside the sheath. It will make the leather more resistant to water and will protect against mold.
If I stitch it now it would be very difficult to put in or out the knife. I have to add new layer to the sheath. I did't plan that but it occured that it have to be done, so the sheath will be more usable.
New layer is glued.
It is cut on one side creating a ramp so it will fit nicely between two sides of the sheath.
You can see that the inside layer is sticking out. It supposed to be like that. I always make the inside layer oversized because now it is very easy to align it to the shape of the sheath.
First I cut it off with a sharp knife.
If blade of the knife is very thin it will cut inside layer with a couple of strokes. But when the leather is very tough/dry or knife is dull you will have to cut it off as you are whittling a piece of wood.
Then I am using a rough sandpaper - grit about 40-60.
It looks ok now. I will not make it more smooth. Jus a 60 grit sandpaper. Final finish will be done after stitching, because that surface will be deformed a little bit during stitching in the next step. I have align it now just to have it smooth enought so I can use a groover.
CHAPTER 5 - Stitching a sheath
Firstly groove have to be done so the thread will hide in it and will be dificult to cut or wipe. On the begining of my leathermaking I was using a knife to cut the groove. Now when I have a groover I have to say that I can't live without it:)
Of course I use it on both sides.
Firs hole should be always make at the edges.I am using an awl to make it.
When I have the first hole I make the other with a overstitch wheel. On both sides!
All the wholes needed are marked.
I use every second hole and make puncture through all layers of the leather. I have holes marked on both sides so I can check if the holes are being made straight.
This is not an easy task. In this sheath we have to go through over 10mm leather.
All holes are done. The sheath is ready fot stitching.
What can be surprising I don't use needles! Holes are big enough so the thread can be puted in it through the layers. If there is not enough space I make it with the awl and try to push the tread one more time. Sometimes it is not easy but I still prefere that method than using needles.
As you can see I use leather finger protectors which are very easy to make and will protect the skin on my fingers against being cut withe the tread. I use a lot of my strernght to tighten the thread.
Stitching is the longest process in making a simple leather sheath. It requires a lot of patience. Have to be done carefully and slowly.
1,5 hour later...
Finally the thread is ready.
In the nick of time, because it started to getting dark.
CHAPTER 6 - Final finish
When the thread is done all the surfaces and edges can be finished too. Once more I use sandpaper to smooth the edge.
It looks like this after 120 grit sandpaper. It is time to bevel the edges.
This is how an edge beveler works. Very easy to use if sharp enough.
To smooth the edges more I use sandpaper with grit from 200 to 400.
At the end I polish the edges with a handle of the awl. I like it nice and round.
To prevent it from soaking water, first, I apply some camellia oil. It will penetrates the leather very good.
You can see thet the edges soaked oil well.
I am using a warm PALC balsam which will not be soaked so good but will give more protection agains water and make the sheath more elastic. It will also prevent against cracking of the leather surface. I make it warm with a lamp from my desk.
When it is warm enought and smooth I applied it with a finger. The whole surface have to be lubricated well.
I use hair dryer so the balsam will penetrate the leather deeper.
This time I will also use some special appreteur/leather conditioner. Thanks to that the sheath will be complitely waterproof (and shining) without requiring continious splication of balsam. I aplled it with a smooth cloth and once again use a dryer to speed up the drying.
CHAPTER 6 - The result
Freshly after finishing the leather sheath looks like this.
 Leather was finished with Fiebing's Professional Oil Dye (Dark Brown and Black), SNO SEAL and Gum Tragacanth for edges. Shock cord is used to pull away a strap. All parts are detachable if needed. Sheath can be attached in vertical and horizontal position. There will also be a kydex holster for a firestarter like here Picture with firestarter added.